Get started with Event Store Cloud
Getting your first project up and running in Event Store Cloud requires a little configuration upfront. Once this is done, provisioning and managing EventStoreDB clusters can be done with ease, all without the big overhead on DevOps that on-premise/self-managed servers cause.
Ready to get started? Follow our steps below to get your first EventStoreDB cluster running in the Cloud.
Prerequisites >
Step-by-step guide >
Prerequisites
- Sign up for an Event Store account by visiting console.eventstore.cloud. If you have signed up for discuss.eventstore.com before you can use those same login details.
- Create an Organization in the Event Store Cloud UI/Console.
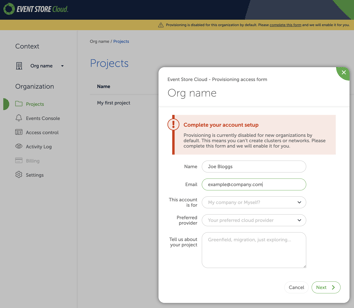
- Set up a billing account to enable the provisioning of resources. Either complete the form on the Cloud UI/Console or the standalone form here. Our team will let you know when everything has been set up and your account is ready to start provisioning resources.

- Have access to an Amazon Web Services (AWS), Microsoft Azure, or Google Cloud Platform (GCP) account with permissions to create/edit Virtual Private Clouds (VPCs) and routes. The regions of your Event Store Cloud network and your VPC must match, and normally your network would also be accessible by applications that you want to connect to the new Event Store Cloud ESDB cluster.
Once you have completed all the prerequisites, you can start the short process to create a network, peer it with your VPC, and provision your first cluster!
Follow these steps to provision your first EventStoreDB cluster in the Cloud
- Log in to the Event Store Cloud Console/UI
- This is where you’ll get everything set up for the first time. Once that’s done you can start to manage your Event Store Cloud resources through other means such as the API/CLI tool.
- Visit https://console.eventstore.cloud
- Navigate to your Organization
- You can have one organization, or multiple depending on your use case. Billing account details and provisioning access are on a per-organization basis.
- Navigate to the Organizations page and choose the one you want to use.
- Create a Project (or navigate to one if you’ve already created it)
- You can have multiple projects per organization. Projects serve as a logical grouping of cloud resources. For example, you might create separate projects per environment (test, staging, production) or per application, where each application might have one cluster per environment.
- From the projects page, you can navigate to an existing project (if you have one) or create a new project.
- Create a Network and peer it with your VPC in your chosen cloud provider
- This is where it gets a bit more technical: you will need access to your AWS/Azure/GCP account at this point to check some details about your VPC, and you will need some basic understanding of networking.
- Follow the guide here for your chosen provider:
- Provision an EventStoreDB cluster
- Event Store Cloud allows you to provision a basic single-node cluster of EventStoreDB for a low cost, plus you can spin them up for as long as you want: you just pay for the time it’s been running for (charged hourly + disk and network charges).
- You can provision a new cluster through the Console/UI in minutes!
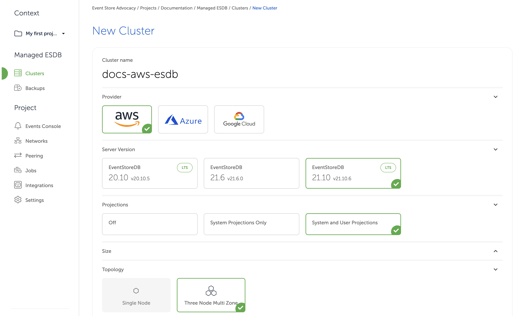
- Navigate to the relevant project then Custers and click "New cluster +".
- You'll be presented with this wizard that will allow you to create a new cluster:

- Once the cluster is created it will take a few minutes to provision, go back to the Clusters page and hit the refresh button to check on the progress.
- Connect to your new EventStoreDB cluster
- You can connect to your new EventStoreDB cluster either from your VPC or by using TailScale.
- Further information on setting up TailScale can be found in our docs.
- On the Clusters page, you can click on the relevant cluster and then navigate to the "Addresses" tab to find connection strings for TCP, gRPC, and the UI.
- Find out more about connecting to the cluster with one of our clients.
- Migrate data from an existing EventStoreDB cluster
- You can migrate data to the cloud cluster using live migration by replication. Live migration is done by reading events from the source database (from $all) using a client protocol (TCP or gRPC) and then writing those events to the target database.
- Event Store provides a tool that allows you to replicate events between two clusters. The tool is called Event Store Replicator, and it has its own documentation website.
- Live migration can handle small to medium size databases. If you are in doubt, get in touch here.
Conclusion
Once you are set up in Event Store Cloud, it takes minutes to provision new clusters. There is a range of features to support you as you move from development to production. With security and high availability as standard, plus a reduced workload on DevOps, choosing Event Store Cloud over on-premise can allow you to speed up development time and focus on building your application, rather than managing the server.
If you have any questions or would like to discuss your project with our team, please get in touch here and we'll be happy to help.